
The builder continues progress on a budget-friendly Honda CX500 mission, specializing in bettering each perform and look. After finishing work on the rear body and seat, consideration now shifts to cleansing up the entrance finish. He explains design and fabricate customized components at residence utilizing easy instruments, exhibiting that cautious planning and small changes can result in skilled outcomes with out excessive prices.
He additionally covers vital upkeep steps, like defending the gas tank from rust and creating customized facet covers that match the bike’s new design. By means of every step, he demonstrates sensible strategies and shares classes discovered from errors, serving to others keep away from widespread points and construct confidence in their very own initiatives.
Key Takeaways
- The mission reveals improve a motorbike affordably with customized components.
- Cautious preparation and the appropriate instruments make fabrication simpler.
- Upkeep and a spotlight to element stop pricey repairs later.
Challenge Overview and Progress
Body Alterations
He continued refining the Honda CX500 by adjusting the body to suit the new design. The rear part had already been shortened, and a curved hoop with a customized insert was welded in place. This setup supported the brand new seat and tail gentle meeting. The entrance space nonetheless wanted cleanup for the reason that wiring and gauges remained inventory.
Key updates:
- Rear body trimmed and bolstered
- Hoop and insert put in
- Wiring and headlight space ready for modification
Seat Fabrication
He constructed a brand new seat base, added foam, and formed it to match the bike’s new profile. The reshaped seat left a visual hole above the facet covers, which led to designing customized panels. He used brown paper templates to map out folds and shrink factors earlier than transferring them to steel.
Instruments and supplies used:
| Software | Objective |
|---|---|
| Nylon hammer | Shaping steel |
| Sandbag | Supporting curved work |
| Planishing hammer | Smoothing surfaces |
| Shrinker-stretcher | Adjusting steel contours |
He emphasised that steel shaping could be accomplished with primary instruments or upgraded with energy hammers for quicker outcomes.
Rear Lighting and Hoop Setup
The tail part featured a brand new gentle mounted into the customized hoop. He fabricated brackets from flat metal, preserving the design easy for residence builders. The headlight, quickly put in, got here from a buddy and would later get replaced with a higher-quality unit.
He additionally eliminated and deliberate to relocate the horn for a cleaner look. The mounting brackets have been lower utilizing a CNC software, however he famous {that a} jigsaw or hand noticed may obtain the identical outcomes with endurance.
Steps adopted:
- Lower and bend metal brackets
- Take a look at match lighting elements
- Regulate horn placement
- Put together for future headlight improve
Entrance Finish Customization
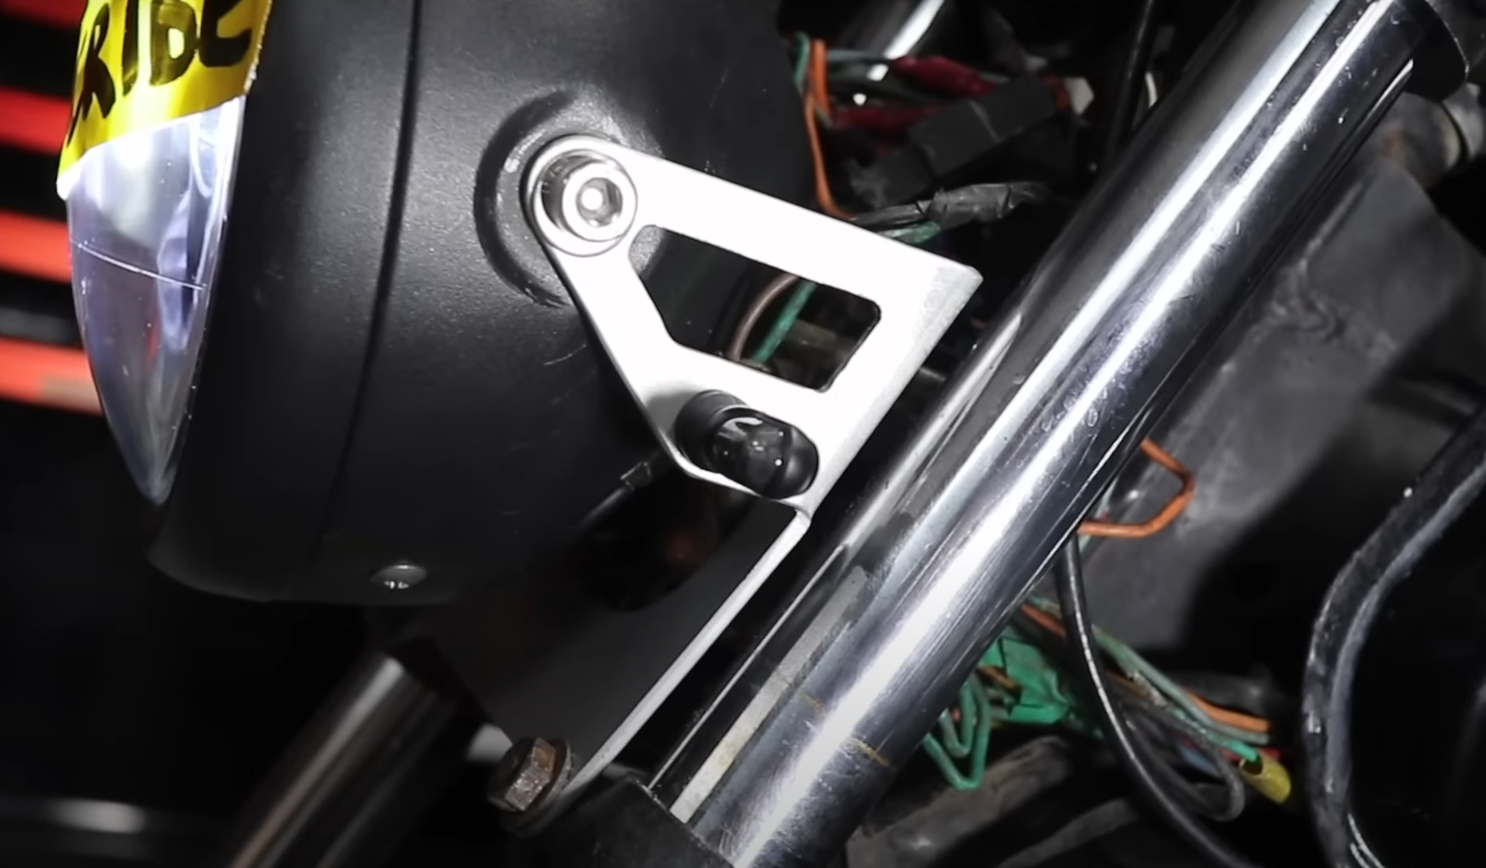
Cable and Wiring Setup
He organized the wiring on the entrance of the bike, which had turn out to be messy throughout earlier work. The unique gauges stayed in place for now, however he deliberate to improve them later. He additionally eliminated the horn and thought of relocating it larger up and out of the best way.
Steps Taken:
- Eliminated free cables and grouped them neatly.
- Deliberate a cleaner format for higher entry and look.
- Checked connections to verify every little thing functioned correctly.
| Part | Motion | Standing |
|---|---|---|
| Gauges | Saved unique | Short-term |
| Horn | Eliminated for relocation | Pending |
| Wiring | Organized and secured | Accomplished |
Instrument and Lighting Changes
He used a 160 mm headlight {that a} buddy had given him. It wasn’t his most popular fashion, nevertheless it labored for now. He defined that cheaper lights usually fade, rust, or leak water, so he deliberate to switch it with a higher-quality one later.
Notes:
- Finances components can get monetary savings brief time period however could fail rapidly.
- Correct lighting improves each security and look.
- Investing as soon as in sturdy components avoids repeated replacements.
Headlight Mount Development
He designed a easy bracket comprised of flat metal to carry the headlight securely. His first thought concerned stainless fittings and a connecting bar, however he switched to a single-piece design that was simpler to make at residence.
He used an ArcDroid to chop the form however famous {that a} jigsaw or hand noticed with a steel blade would additionally work. After reducing, he bent the steel utilizing a pan brake, however instructed {that a} bench vise or angle grinder may obtain related outcomes.
Instruments Talked about:
- ArcDroid cutter
- Jigsaw or hand noticed
- Pan brake or bench vise
- Angle grinder
The ultimate bracket match neatly to the bike’s mounting factors and gave the entrance finish a cleaner, extra completed look.
Finances-Pleasant Customized Components
Selecting Reasonably priced Supplies
He makes use of primary metal sheets and easy {hardware} to construct customized components with out overspending. Flat metal works nicely for brackets and mounts as a result of it’s simple to chop, bend, and weld. Stainless-steel is an effective possibility for items that want extra power or rust resistance.
| Materials | Value | Greatest Use |
|---|---|---|
| Gentle Metal | Low | Brackets, mounts |
| Stainless Metal | Medium | Uncovered components |
| Aluminum | Medium | Light-weight panels |
Holding supplies easy helps scale back waste and makes repairs simpler later.
Easy Strategies and Helpful Instruments
He usually depends on primary instruments to form and match components. A jigsaw with a steel blade, hand noticed, or angle grinder can exchange costly reducing machines. For bending steel, a bench vise or pan brake provides clear edges.
- Jigsaw or hand noticed
- Angle grinder
- Bench vise
- Nylon or ball-peen hammer
These instruments enable most small initiatives to be accomplished at residence with out particular gear.
Reusing and Repurposing Components
He makes good use of donated or spare elements from previous builds. For instance, a gifted headlight saves cash even when it’s solely momentary. Previous components could be cleaned, repainted, or modified to suit new designs.
Tip: Preserve a labeled field for spare components. It helps observe what could be reused as an alternative of shopping for new items. This strategy retains prices low whereas giving every mission a private contact.
Tank Restoration and Safety
Making use of the Inside Tank Coating
He begins by cleansing the within of the gas tank utilizing an aqua cleaner to take away previous residue. The tank soaks for some time, then will get rinsed with clear water till the runoff appears to be like clear. Subsequent, he provides a rust remover and slowly rotates the tank so each space stays moist and the rust dissolves. After one other rinse, he lets the tank dry fully earlier than including the sealant.
He pours within the sealer, rotates the tank once more to coat each floor, and drains the additional liquid. Even the filler cap spring and chain obtain a skinny coat for added safety. The drying stage takes probably the most time, however the course of itself stays easy and efficient.
Defending Towards Corrosion and Paint Failure
He stresses that skipping a tank liner can destroy a paint job. Rust from contained in the tank can eat via the steel, letting gas bubble the outside paint. To keep away from this, he all the time seals the tank earlier than portray or preserving the unique end. A correct liner retains moisture and gas from damaging each the steel and the paint floor.
Fast Suggestions:
- At all times dry the tank fully earlier than sealing.
- Preserve the coating even by rotating the tank slowly.
- Use clear water for rinsing between every step.
Trusted Tank Liner Choices
He recommends utilizing a excessive‑high quality liner equipment that bonds firmly to the steel. Low cost merchandise can peel off and clog the gas system. His most popular model is KBS, which offers dependable protection and lengthy‑time period safety.
| Product | Key Characteristic | Purpose to Use |
|---|---|---|
| KBS Tank Sealer Equipment | Robust adhesion | Prevents liner flaking |
| Rust Remover (included) | Quick rust elimination | Cleans steel floor earlier than sealing |
| Aqua Cleaner (included) | Degreases tank | Ensures liner bonds correctly |
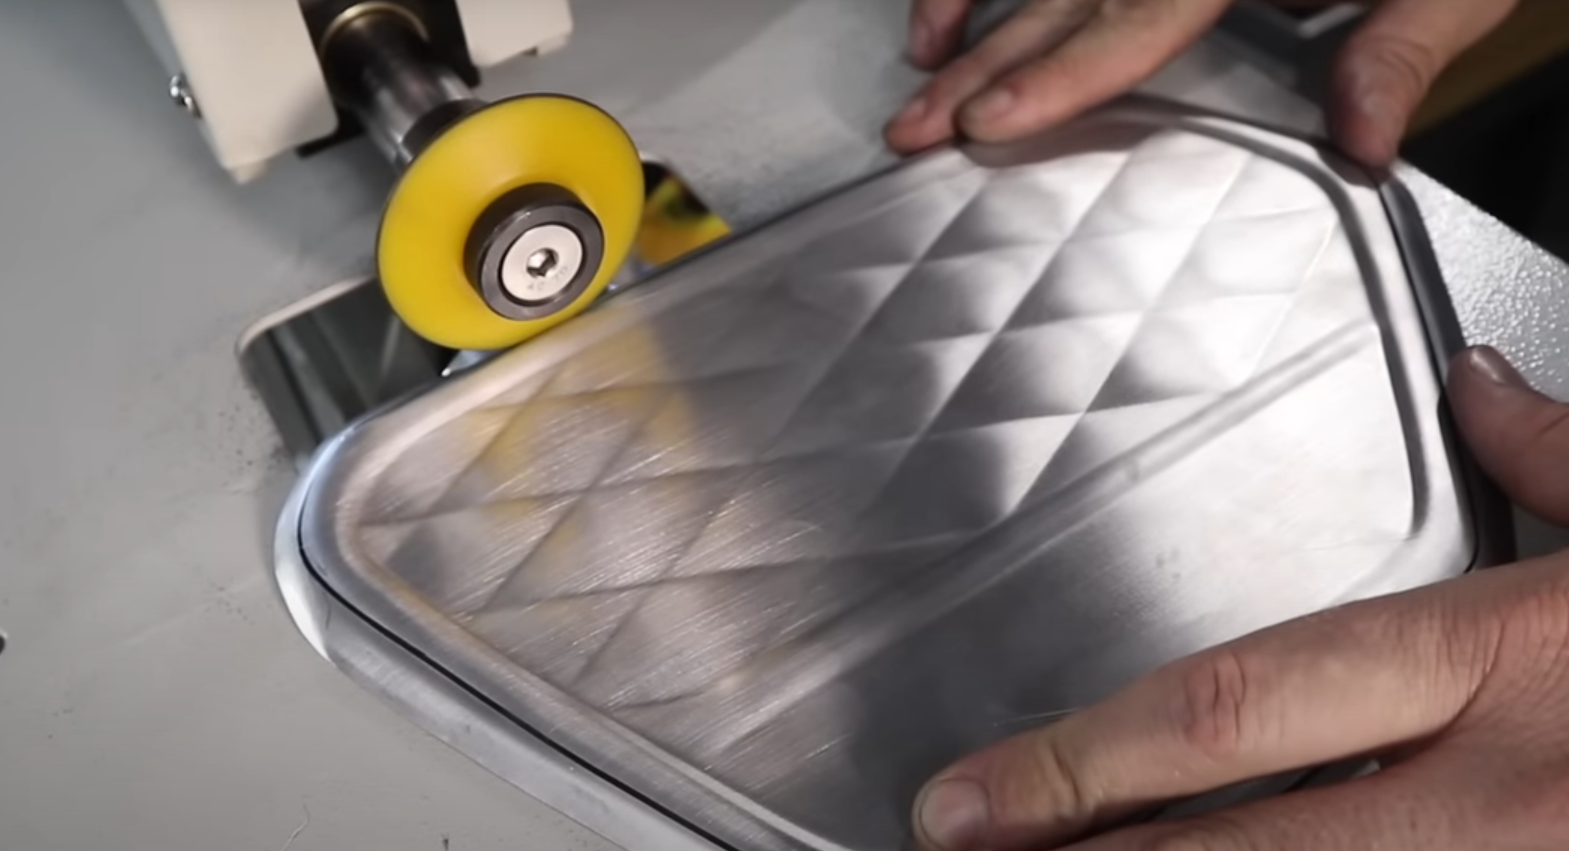
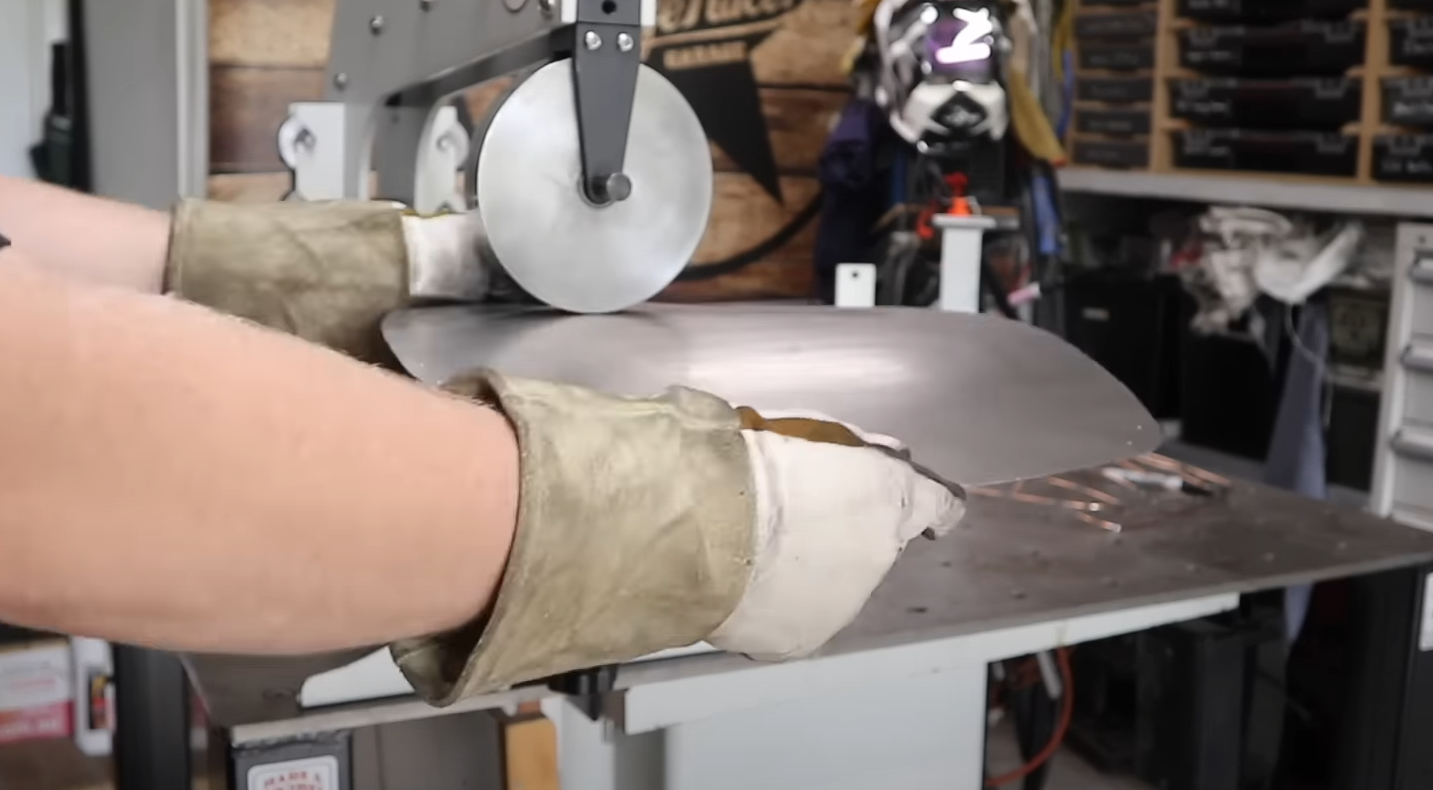
Aspect Cowl Customized Fabrication
Planning and Design Particulars
He started by noticing a big hole left after reshaping the seat, which made the unique facet covers now not match accurately. As a substitute of leaving the area open, he selected to create new customized panels that may maintain the airbox and battery in place. This alternative averted tuning issues widespread with CV carburetors when the airbox is eliminated.
Key design objectives:
- Keep perform of the airbox and battery
- Enhance the look of the midsection
- Preserve the method easy sufficient for residence fabrication
Sheet Metallic Forming Strategies
He used primary steel shaping instruments, exhibiting that customized work could be accomplished with out costly gear. Instruments like a shrinking stump, nylon hammer, planishing hammer, and English wheel helped kind easy curves.
For these with out superior instruments, he instructed utilizing:
- A ball-peen hammer or tow ball as a planishing dolly
- A bench vise for holding small components
- A sandbag for shaping and smoothing
He additionally used powered instruments akin to a pneumatic planishing hammer and shrinker-stretcher to hurry up the method.
| Software | Objective |
|---|---|
| Shrinking stump | Reduces steel in tight areas |
| Planishing hammer | Smooths floor after shaping |
| English wheel | Refines curves and contours |
Wire Body and Sample Format
He constructed a wire body to outline the form of the facet cowl. Brown paper was positioned over the body to mark the place the paper wanted pleats to match the shape. Every pleat confirmed the place the steel would wish shrinking.
This paper sample was then transferred onto the sheet steel, guiding the place to stretch or shrink the floor. He emphasised checking the match usually by inserting the wire body over the workpiece and adjusting any gaps earlier than persevering with.
Tip: At all times be aware the place the wire touches the steel—these factors want stretching, whereas gaps point out shrinking areas.
Important Instruments and Tools
Primary Metalworking Instruments
Working with steel requires just a few easy hand instruments. A nylon hammer, planishing hammer, and shrinking stump assist form and easy panels. A sandbag helps curved work, whereas an English wheel refines the floor. Even widespread instruments like a ball-peen hammer or a tow ball clamped in a vise can function a planishing dolly.
Fast Tip: At all times place a mushy layer between two metal hammerheads to forestall harm or cracking.
Energy Instruments for Quicker Work
Energy instruments make fabrication faster and extra constant. A energy hammer and pneumatic planishing hammer velocity up shaping, whereas a shrinker-stretcher helps kind tight curves. For reducing, a CNC reducing robotic, jigsaw, or hand noticed with a steel blade all work—solely the reducing time adjustments.
| Software | Principal Use | Profit |
|---|---|---|
| Energy Hammer | Shapes steel rapidly | Saves time |
| Shrinker-Stretcher | Kinds curves | Improves precision |
| Jigsaw with Metallic Blade | Cuts metal sheet | Simple to manage |
Security Practices in Fabrication
Metalwork calls for consideration to security. At all times put on eye safety, gloves, and listening to safety when reducing or hammering. Preserve fingers away from shifting components, and safe supplies in a bench vise earlier than bending or grinding.
Guidelines for Secure Work:
- Put on protecting gear
- Preserve instruments maintained
- Work in a clear, well-lit space
- Keep away from speeding via cuts or welds
Troubleshooting and Frequent Errors
Shaping Metallic Issues
When shaping sheet steel for facet covers or brackets, uneven stretching or shrinking usually causes warping. If the steel buck touches in some areas however leaves gaps in others, it means the panel wants extra stretching the place it touches and shrinking the place it lifts.
Frequent errors embrace:
- Over-hammering one space, which makes the floor skinny and weak.
- Ignoring alignment between either side, resulting in mismatched panels.
- Skipping take a look at suits, which hides small form errors till the top.
A easy approach to observe drawback spots is through the use of paper patterns. Creases within the paper present the place shrinking is required earlier than transferring marks to the steel.
Fixing and Adjusting Methods
To right shaping errors, work slowly and examine progress usually. Utilizing a shrinker-stretcher, planishing hammer, or perhaps a bench vise with a dolly helps even out curves.
| Challenge | Trigger | Correction |
|---|---|---|
| Panel bows outward | An excessive amount of stretching | Shrink edges barely |
| Panel caves inward | Not sufficient stretch | Add light hammer blows in middle |
| Uneven floor | Inconsistent hammering | Planish with gentle, even strikes |
When utilizing energy instruments, preserve management and keep away from speeding. Heavier instruments like pneumatic hammers velocity up work however can simply distort skinny steel if used too aggressively. Often evaluating either side of the bike ensures symmetry and a clear last match.